|
95 Common Devices
A long time coming, but worth it.
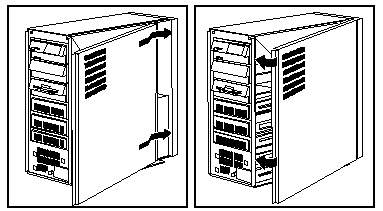
Open Case
Close Case
Install Memory
Early 95s without Shutter over
Power Switch
Mounting Hardware
Install Floppy Drive
Remove Rail Guide from Storage Trail
Insert Rail Guide
5.25" Drive Rail Dimensions
3.5" Hard Drive Mounting Tray
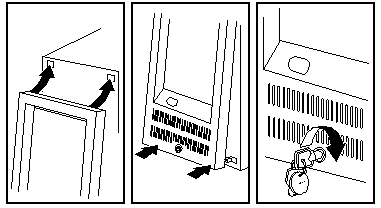
Open Case
1. Remove the front cover:
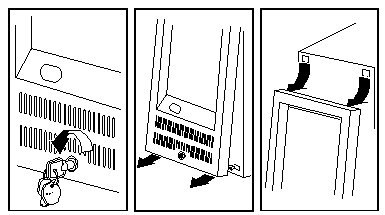 a. Unlock the cover. (If you have a key, you are unique)
b. Grasp cover at bottom and firmly pull it away
from server.
c. Remove the top corners of the cover from the
server.
NOTE: Do NOT twist the bezel
to one side!. The pivot points WILL snap if you apply too much crosswise
force.
2. Remove the side cover:

a. Pivot side cover away from the front of the server.
b. Pull the cover forward.
c. Place cover so as to protect the fan from possible
damage.
NOTE: The EMC bezel in the
front right corner (shiny metal springs) is quite sharp if you pull up
or down on this edge of the case. Hint, Hint...
3.. Remove the drive retainer: (Only to install/remove drives)
a. Press down on both top latches.
b. Pull the top of the retainer out from the server.
c. Pull the retainer up.
Now you do whatever you were going to do inside the case...
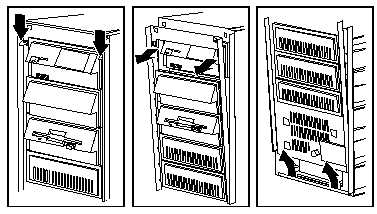
Close Case
1. Install the drive retainer: (Only if you removed
it previously)
a. Insert tabs on drive retainer into groove at bottom
of server.
b. Pivot retainer into position.
c. Push retainer until it clicks into place.
NOTE: You may have to "play"
with the drive retainer. Try pulling it up a little and wiggle it while
pivoting it into position.
2. Replace the side cover:
a. Align rear of side cover with
the groove at rear of frame.
b. Align top edge of side cover
over top of frame.
c. Push side cover closed.
NOTE: If you have one hand
on the top of the case with fingers inside the case, do NOT attempt to
close the side cover. #1, it won't work, and #2, you will need Band-Aids
for the flesh wounds.
Note:
Do not damage the hardware around side cover fan when installing the covers.
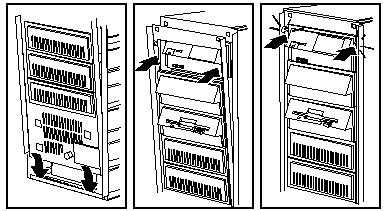
3. Replace the front cover:
a. Slide top posts into the holes
at the top of the server. You may have to press the side
cover closed if the old flat SCSI cable is used. Be cautious
- if the side cover won't easily close, check your cable routing. A problem
area is towards the front of the complex and behind the DASD Support Structure.
NOTE: Do not accept the prongs
on the front cover going in the mounting holes at an angle!
NOTE: The front cover MUST
fit over the front edge of the side cover!
b. IF front cover swings ON IT'S PIVOTS
over front edge of side wall cover, smack the front cover bottom, one corner
at a time, until it snaps into place.
If front cover does not snap into place
Is it able to fit over the front
edge of the side cover?
Make sure the drive retainer has
been installed correctly.
Are all indexing posts on front bezels
aligned with the holes in the DASD Support Structure?
On a 95A or 85 K/N system, the LogicLock
switch on the drive retainer may not be firmly
seated, and has been partially knocked off. Reseat the switch.
(white plastic box, about that of a
small matchbox).
c. Lock the front cover.
Note:
If you ever enable the LogicLock on a 95A or 85 K-N and move your system,
be
sure not to jar or pull on the front cover. Security features
on the cover will respond as if someone is trying to break into your server,
giving you an error message.
NOTE: If you enable the unauthorized
access feature on a 95A or 85 K-N and you forget the
password, you will be unable to run system programs ever again
with that planar. Do NOT enable the unauthorized access feature unless
you REALLY, REALLY need it. You had better have a key for the bezel lock
also. These systems are C2 rated.
Ventilation Requirements
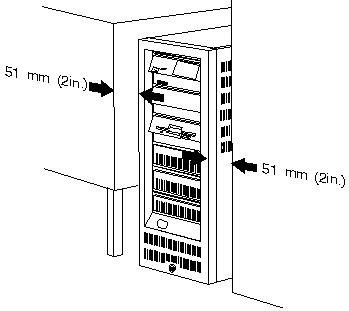
Warning: Be sure to maintain a clearance of at least 51
mm (2 in.) on all sides of the server to
allow for air circulation.
Install
Memory on 85 or 95
1. CAUTION:
When you tilt out the power supply, do not let it drop. Personal
injury or
damage to the server might result.
Tilt out the power supply:
a. Disconnect drive power cables
from the power supply.
b. Unscrew the blue spring-loaded
retaining knob until it releases.
c. Place one hand on top of the
server to support it.
d. Tilt out PSU with the other
hand. (Be sure the AC power cord is removed from the server
before you try to tilt out the power supply.)
2. Install SIMMs in pairs of the same size, speed, and type.
All memory must be of the same type (parity OR ECC). Install
SIMMs in the following order: A1-B1, A2-B2, A3-B3, A4-B4.
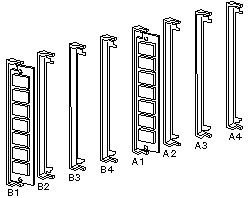
A and B Bank Layouts
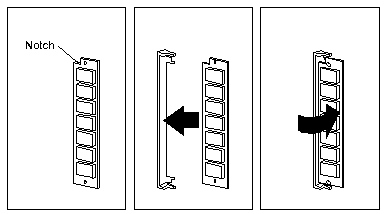
3. Touch any unpainted metal surface on the server.
This equalizes the voltage potential between you and the system. Remove
the SIMM from anti-stat package (if applicable) and place it into the SIMM
socket WITH THE NOTCH UP. Push the
SIMM in and slowly rotate it to the right untill it snaps into place.
SIMM Orientation
4. Reinstall the power supply:
Move the power and SCSI cables
out of the way.
NOTE! If you have a SCSI
CD rom with an external terminator on it in the single 5.25" bay, this
is referred to as a "guillotine"! Push the CD Rom drive forward,
then hold the SCSI cable towards the front of the case while rotating the
power supply back in. Or you WILL be sorry...
Tilt the power supply into the
server. Press in the retaining knob and turn it to the right until it is
tight. NOTE! Do NOT tighten the blue
knob more than finger tight! Otherwise the e-clip will be deformed and
it will fall off... More details HERE
Reconnect the twisted power cables to the power supply.
Early
95s without Shutter over Power Switch
> Early 8595 have no clear springy cover over the power switch. It's
kinda funky looking having a beige "ring" around the white switch.
Tony Ingenoso replies:
These are the earliest models - undoubtedly a T1.
That "feature" was rectified fairly quickly when the complaints rolled
in from the field. People who had 'em on the floor were turning them off
by mistake thinking they were reaching for the FDD eject button.
This is one of the few truly
lame things about the 95 -- because the test labs were complaining
about the same thing fairly early on.
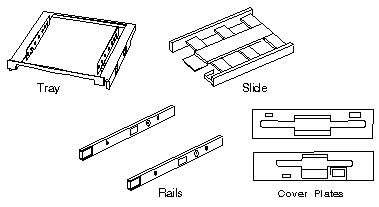
Mounting Hardware
Drives come in a variety of heights. You can install half-high
drives that are less than 41.3 mm (1.6 in.) high in any of the bays.
Drives that are greater than 41.3 mm (1.6 in.) high (full-high) can be
installed in bay C or bay D. Bays C and D can each hold two half-high drives
or one full-high drive.
Slide - Mount floppy drive sized devices
in Bays A and B (floppy, tape, or PCMCIA)
Tray - Mount 3.5" drives in the 5.25" drive
bays.
NOTE: You will need Rail
Guides in the DASD Support Structure!
Rails - Mount 5.25" drives (floppy,
CD, HD)
Cover plates
(sometimes called bezels) cover the front of each installed drive. If you
install a drive that uses removable media (diskette, tape, optical disc,
or CD), you will need to change the cover plate.
Installing
Floppy Drives
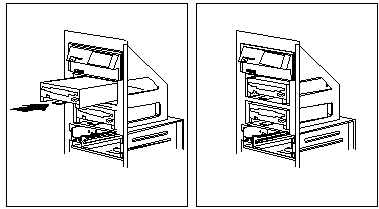
Install the diskette drive in bay A or B:
Note: The figures that accompany these steps show the installation
occurring in bay A. These instructions also apply to bay B.
a. If a flat cable is folded inside bay A, unfold it and
route it along the back of the bays.
b. Position the drive so the connector is facing the rear
of the server.
c. Align the drive with the guides on the bottom of the
bay.
d. Slide the drive into the bay until it stops.
3. Locate the connector on the flat cable directly behind the
bay you are using (A or B), and connect it to the back of the drive.
Note: For bay A, use the
middle connector (labeled "P2-1"). For bay B, use the bottom connector
(labeled "P2-0"). FWIW, P2-2 is for a floppy tape backup OR for a
5.25" floppy.
3.5" Floppy Drive Slide 64F0156
1.2MB 5.25" Floppy 64F4102
5.25" FloppyDrive Slide 85F0040
5.25" Floppy Rail Kit 85F0041 (Use
5.25" Drive Rail)
5.25" Floppy Bezel 64F4103
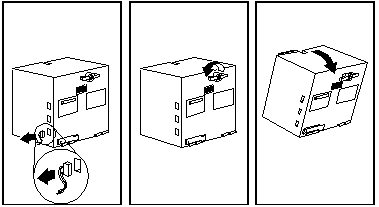
Remove
Rail Guide From Storage Tray
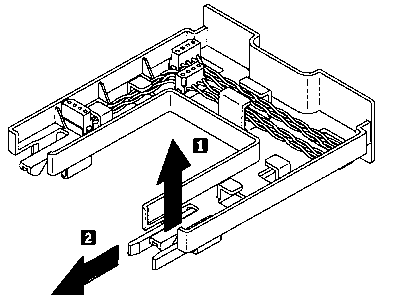
Pull up on the tab (1) on the back of the tray and pull out the rail
guides stored on the bottom of the tray.
Storage Tray 84F8075
Rail Guide 60G9827
Insert Rail
Guide
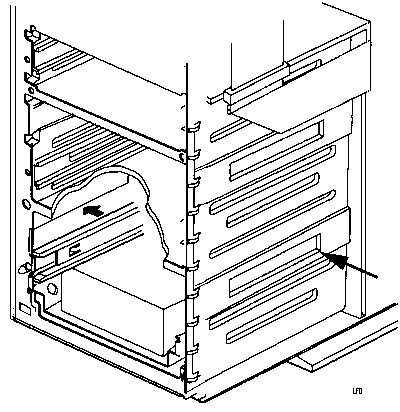
Press a rail guide into each side of the DASD support structure. The
left and right guide rails are the same.
5.25" Drive
Rail Dimensions

I measured this from a single RAID bay.
HD Mounting Tray
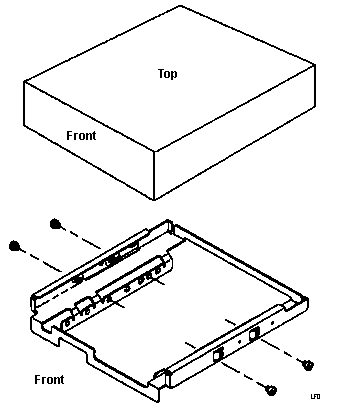
85 P/N 85F0013
95 P/N 64F0141
My 9595s are stamped 10G4769.
NOTE: The drive may be installed
in the tray with the mounting screw flange pointed down (as pictured)
or pointed up. This is helpful if you have a mix of 1.6" and 1" drives
to install.
9595 Main Page
|