|
IBM 127 / 230 (MO) Drive
obirwopt.exe
OBI 127M R/W Optical Option Diskette
127m_dos.exe
OBI 127M R/W Optical Driver for DOS
127m_os2.exe OBI 127M
R/W Optical Driver for DOS
Fujitsu
Drivers for MO Drives
MO Drives Directly Supported by IBM Drivers
Formatting the 230MB MO Under WinNT
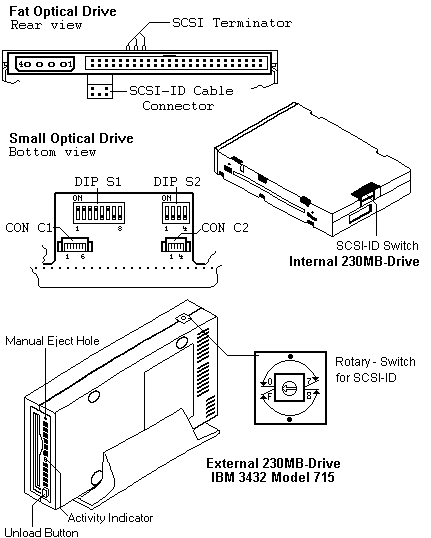
IBM 127MB Magneto-Optical (MO)
Disk Drive
If there are only FORMAT problems (read/write/copy
is working) under OS/2, then check the MO drivers in CONFIG.SYS. If OPTICAL.SYS
is used, then a replacement of OPTICAL.SYS can solve the problem
In all cases, you should first CLEAN the drive/media,
before starting TESTs, or replacements. see Optical Disk Drive Parts for
the appropriate tool for the drive in use.
Next find the DRIVE-TYPE you are working with (FAT / SMALL or
230MB)
1 . FAT 3-sets of PIN's/jumpers on the
upper left and right front side.
2. SMALL A sticker, describing all switch
and jumper meaning, is on the Drive-bottom.
3. 230MB / 127MB Magneto-Optical (MO) Disk
Drives.
A contaminated-optical lens will cause the optical drive to be slow
in reading an optical disk, or could cause a drive failure. Use the
optical lens cleaning cartridges (PN 38F8681 and 38F8682) to clean the
drive lens.
If the system loses power while an optical cartridge is loaded in the
drive, the cartridge can be manually ejected. Insert a straight object,
such as a small screwdriver, through the manual cartridge eject opening
in the cover plate and press. The optical cartridge will manually
eject.
FAT - Drive
The optical drive requires a minimum amount of air flow
through it. Always install the system covers before performing a long continuous
drive test.
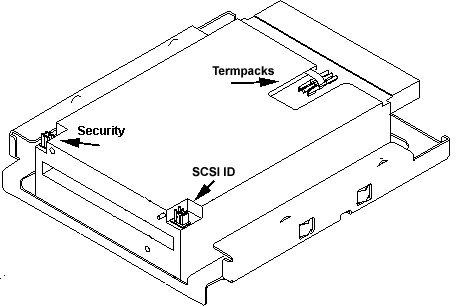
Security Jumperblock
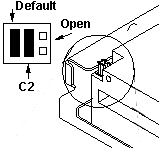
Left - MUST be PRESENT (default
present)
Middle - Security jumper (default
present)
Right - MUST be OPEN (no
jumper)
Do not remove the security jumper (C2
in illustration) unless you have a PS/2 computer with the security
feature with the privileged-access password enabled. (NOTE:
Enabling the PAP is very serious! If you forget the PAP, you can no longer
access the system programs. You have been warned.) If the jumper
is removed, and the PAP is not enabled, you will not be able to load or
eject the media.
SCSI ID Jumperblock
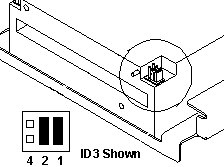
Rear of Fat MO
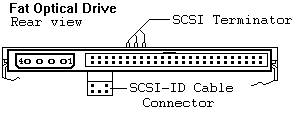
Note: Remove the SCSI ID
jumpers when the optical drive is to be installed in a Model 3510.
NOTE: SCSI-ID Cable Connector is
actually the Remote SCSI-ID Cable Connector.
MO Drives Directly
Supported by IBM Drivers
UZ wrote:
IBM has DOS and OS/2 drivers for the early MO-drives.
This is the list I compiled from the driver's inside, the first entry is
most likely a 230M drive (the next two are 125M, I've got MD3125A or B).
Query one of the IBM model numbers to find the drivers on IBM's site:
IBM
MTA-3230
IBM
MD3125A
IBM
MD3125B
IBM
MTA-3127
IBM
CAPELLA
IBM
00C1
IBM
063
IBM
0632ACA
IBM
0632CCA
IBM
0632CHX
MaxOptix Tahiti 2 |
MELCO MW-5E3
MELCO ME-3E1
RICOH RO-5031E
SONY SMO-C501
HP
S6300.65
MOST RMD-5100
SONY SMO-C301
MATSHITA LF-3000
TEAC OD-3000
TOSHIBA OD-D300
FUJITSU M2512 |
Small 127MB MO Drive Jumpers
Honestly, the CON switch settings are quite confusing to me.
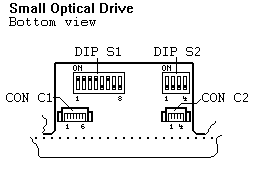
DIP Switch S1 - Drive FUNCTION
FUNCTION
1 2 3 4 5 6 7 8
DEFAULT Setup (Factory) 1 1 1 1 0
1 0 0
Create unit Attention
1 - - 1 - - - -
Disable Unit Attention 0 -
- 1 - - - -
Check SCSI Parity
- 1 - 1 - - - -
Ignore SCSI Parity
- 0 - 1 - - - -
Device Type X'07'
- - 1 1 - - - -
Device Type X'00'
- - 0 1 - - - -
No Spin Up on POR
- - - - 1 - - -
Auto Spin Up on POR
- - - - 0 - - -
No Security Mode (normal) - - - - - 1 - -
C2 Security Mode
- - - - - 0 - -
Without Power Saving Mode - - - - - - 1 -
With Power Saving Mode - -
- - - - 0 -
Reserved (MUST be OFF) - -
- - - - - 0
Mode Page 1,2,3,4 Support 1 1 0 0 - - - -
(With Device TYPE X'00')
DIP Switch S2 SCSI ID
FUNCTION
|1 2 3 4|
SCSI Addr. 0
|0 0 0 -|
SCSI Addr. 1
|1 0 0 -|
SCSI Addr. 2
|0 1 0 -|
SCSI Addr. 3
|1 1 0 -|
SCSI Addr. 4
|0 0 1 -|
SCSI Addr. 5
|1 0 1 -|
SCSI Addr. 6
|0 1 1 -|
SCSI Addr. 7
|1 1 1 -|
Disable SCSI Terminator |- - - 1|
Enable SCSI Terminator |- - - 0|
FUNCTION (DIP SWITCH and CONNECTOR SETUP)
FUNCTION
| CON C1 | DIP S1| DIP S2| CON C2|
Create Unit Attention |- -
- - - P|0 - 0 0|- - - -|S - S -|
Disable Unit Attention |- - - - -
P|0 - 0 0|- - - -|P - S -|
Device Type X'07'
|- - - - - P|0 - 0 0|- - - -|- S S -|
Device Type X'00'
|- - - - - P|0 - 0 0|- - - -|- S S -|
Mode Page 20 Support
|- - - - - S|1 1 1 -|- - - -|P P P -|
SCSI ADDRESS 0
|- P P P - -|- - - -|0 0 0 -|- - - -|
SCSI ADDRESS 1
|- S P P - -|- - - -|0 0 0 -|- - - -|
SCSI ADDRESS 2
|- P S P - -|- - - -|0 0 0 -|- - - -|
SCSI ADDRESS 3
|- S S P - -|- - - -|0 0 0 -|- - - -|
SCSI ADDRESS 4
|- P P S - -|- - - -|0 0 0 -|- - - -|
SCSI ADDRESS 5
|- S P S - -|- - - -|0 0 0 -|- - - -|
SCSI ADDRESS 6
|- P S S - -|- - - -|0 0 0 -|- - - -|
SCSI ADDRESS 7
|- S S S - -|- - - -|0 0 0 -|- - - -|
Disable SCSI Terminator |- - - - - -|-
- - -|- - - 0|- - - S|
Enable SCSI Terminator |- - - - -
-|- - - -|- - - 0|- - - P|
Normal Mode (Output)
|- - - - H -|- - - -|- - - -|- - - -|
Power Saving Mode (Output) |- - - - L -|- - - -|- - - -|-
- - -|
Ground
(Output) |L - - - - -|- - - -|- - - -|- - - -|
0 = DIP SW -Off
1 = DIP SW -ON
P = CONNECTOR Open
S = CONNECTOR Short to Ground (CON C1-1)
H = HIGH (Output)
L = LOW (Output)
127MB MO-Drive DOS OS/2 CONFIG.SYS examples
CONFIG.SYS example (FAT-drive used with DOS)
DEVICE=C:\IBMRWOPT.SYS
/U
CONFIG.SYS example (SMALL-drive used withDOS)
DEVICE=C:\OPTIMO\OPTIMO.EXE
in an available OPTIMO.CFG file you will
see
rem
timeout 0
adapter
IBM # =0
drive
IBM3125 cid=2 lun =0
CONFIG.SYS example (FAT-drive used with OS/2)
DEVICE=C:\OS2\SCSI.SYS
/N :4
DEVICE=C:\OS2\OPTICAL.SYS
/N:4 /U
(some newer OPTICAL.SYS driver support /T:xx parameters (POWER-save
option, after xx minutes.))
NOTE: (OPTICAL.SYS
parameter)
/L for LONG FORMAT
/N:x Number of SCSI devices in the computer
/Q Quiet mode (no message during OS/2
startup)
/U Unattended mode (OS/2 assign the
drive letter)
CONFIG.SYS example (SMALL-drive used with OS/2 V-2.0 or higher)
If you are running OS/2 V-2.1 or below, you MUST replace the
existing FORMAT.COM file in the C:\OS2 directory, with the FORMAT.COM shipped
with the OPTION. (Optical Disk Driver For OS/2 diskette) (rename
the original FORMAT.COM, do not delete !)
BASEDEV = IBM2SCSI.ADD
/LED (only on PS/2 systems used)
BASEDEV = OS2SCSI.DMD
DEVICE=C:\OS2\MO.SYS
/D1
IBM 230MB Magneto-Optical (MO) Disk Drives
(Internal and External)
Product Description The 230MB MO-drive meets the Small Computer
System Interface-2 (SCSI-2) standards set by ANSI. This drive reads and
writes both 128MB and 230MB optical media. The SCSI supports data
transfer rates up to 5 megabytes / sec.
Format 230MB
MO under NT4
David Ress stumped me with this:LINK:
For Windows NT users, all formatting and partitioning is
done through the "Disk Administrator" in the "Administrative Tools" program
group. To partition media, open Disk Administrator and click once on the
drive in which to partition. (NOTE:
Each time you select an item from the File menu, you must select the drive
first.) From the File menu, select "Create", then click OK. Click on "Mark
Active", then OK. Click "Commit Changes Now", then OK.
Some of them menu commands in Disk Administrator are different depending
on your SP installed, but the directions are basically the same.
System Type Settings
.... for 230MB INTERNAL Drives
System Type Position 1
Position 3
------------------------------------------
IBM PC
ON ON
Apple Macintosh OFF
ON
Sun
OFF OFF
DEC
OFF OFF
.... for 230MB EXTERNAL Drives
System Type Position 3
----------------------------
IBM PC
ON
Apple Macintosh ON
Sun
OFF
DEC
OFF
Termination SETUP (230MB - Internal Drive)
+---------------------------------------------------------------------+
|SCSI-ID
|INTERNAL |Apple / Sun / DEC| IBM PC
|
|
| DIP-SW | EXTERNAL - DRIVE | EXTERNAL - DRIVE |
|
|4 3 2 1 | Rotary Switch | Rotary Switch
|
|---------------------+---------+------------------+------------------|
|SCSI Addr. 7 |-
1 1 1 | 7
| F
|SCSI Addr. 6 |-
1 1 0 | 6
| E
|SCSI Addr. 5 |-
1 0 1 | 5
| D
|SCSI Addr. 4 |-
1 0 0 | 4
| C
|SCSI Addr. 3 |-
0 1 1 | 3
| B
|SCSI Addr. 2 |-
0 1 0 | 2
| A
|SCSI Addr. 1 |-
0 0 1 | 1
| 9
|SCSI Addr. 0 |-
0 0 0 | 0
| 8
|Termination DISABLE |1 - - - | No Term
| No Term
|Termination ENABLE |0 - - - | Terminator
| Terminator
Customization Switch Settings (230MB - Internal
Drive)
If you are not familiar with the customization
switch, use the default settings (marked with (* )
Write cache is used to improve performance
of the Optical Drive by returning a write complete status when the
data to be written has been loaded into the buffer memory of the
Optical Drive. There is a small risk of the data being lost due to a
power loss or drive failure with write caching enabled.
The user should choose either
performance improvement (write cache enabled) or fail-save data integrity
(write cache disabled)
Position 4 defines how the Optical Drive
configures itself after it is turned on or using a SCSI Reset situation.
This setting may be over-ridden by the write caching option chosen in the
device driver. See the README.TXT files that come on the device driver
diskettes for OS/2 and DOS for details.
230MB Internal and External MO Drive Switch
Settings
SW-Pos Description (External drive,
NOTE
SW1 setting)
1 ON (* Enable unit attention
on POR/SCSI reset
OFF
(* Must be OFF for
External Drive to
function properly.
OFF Posn 3 ON:
Disable Unit Attention on POR/SCSI reset (Apple attach)
Posn
3 OFF: Mode Page 1,2,3,4 support (DEC/SUN attach)
2 ON (* Check SCSI parity
OFF Ignore SCSI parity
3 ON (* Device type inquiry
data is hex 07 (optical disk drive)
OFF Device type inquiry data
is hex 00 (hard disk drive)
4 ON (* Write cache disabled
after POR/SCSI reset
OFF Write cache enabled after
POR/SCSI reset
(NOTE:
with pos 1,2,3,4 set to ON,ON,OFF and OFF
respectively,
write cache is disabled after Reset.)
5 ON No spin-up on POR
OFF (* Spin-up automatically
on POR
6 ON (* Normal Mode
OFF C2 Security Mode
7 ON Default interval hex FF
(Do not enter power-down mode.)
OFF (* Default interval
hex 05 (Enter power-down mode after 5 min.)
8 OFF (* Reserved (must remain
OFF)
9595 Main Page
|


